Multiplayer with Mirror
In this guide we add ODIN to a very simple multiplayer game built with Mirror Networking.
Basic Multiplayer Topology
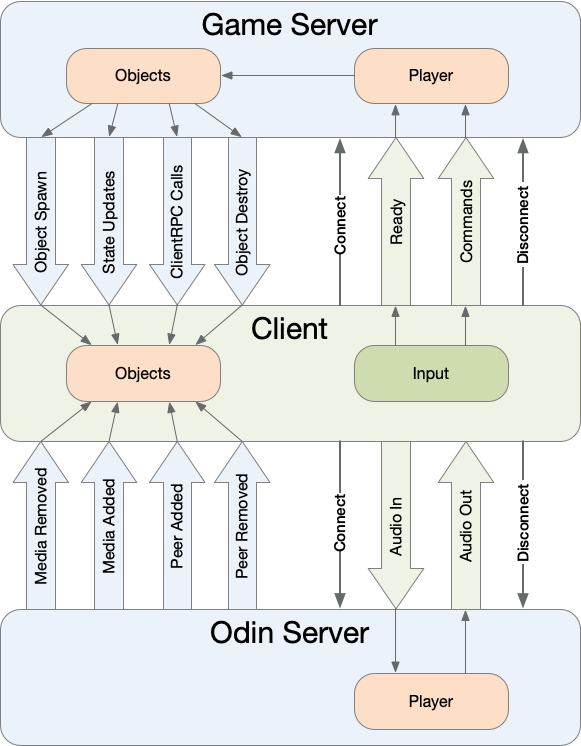
You might remember this graphic which is provided in the mirror documentation. It’s a good starting point to show how ODIN fits into your multiplayer topology:

This diagram basically outlines the general topology of your multiplayer application.
- Clients connect to the server and send input to the server which handles the games state and the objects
- Depending on the authority input sent to the server is just controller input (server authority) or a combination of controller input and game object positions and spawn requests (client authority)
- The server sends events to the client to keep the clients game state in sync with the master game state on the server
Every client has an exact copy of the scene and its game objects kept on the server. Of course, there is always a slight delay depending on the latency (i.e. connection speed) but overall every client has the exact same state.
Basic Multiplayer Topology with ODIN
Of course, you could build voice into your client server application yourself. Instead of sending packets with controller input or positions, you could also send audio packets. Good luck with that. Audio is extremely hard to get right and there are many different input devices (microphone, headsets, etc). So, it’s easer to just use our technology to add voice communication to your application.
This is the same graphic as above, just with ODIN added to the topology. Let’s dive into it:
- Your client/server structure and code is mostly untouched. You can add ODIN without changing anything on your core game
- ODIN can also be removed very easily without touching your game logic and topology!
- ODIN integration is a pure client side implementation, that is, you don’t need to add anything to the server at all!
- Once your player has been connected to the server and the games state is mirrored to the client, ODIN comes into play.
- The client joins a room by name and starts sending audio data captured from the input device.
- The ODIN server sends events to the client (as your game server does).
- Whenever a client is connected to the ODIN server an OnPeerJoined event is sent to the server. An OnMediaAdded event is sent directly after that if the client is sending audio data (someone might be connected to ODIN but without sending any audio - i.e. just a listener)
- The client attaches the audio source to the corresponding players game object and removes it once the client disconnects from ODIN
- That’s it. The players running around the scene will act as a audio source and it’s up to you how to handle that voice stream in the game
Let’s dive into the actual integration.
Creating a simple multiplayer game
Mirror networking has a very good guide on how to get started. We don’t want to replicate that excellent document here, so head over to Mirror networking and follow the steps. We stopped at Part 11 (as subsequent steps like weapons and switching is not relevant for this guide).
After you have followed the steps, you have created these things:
- A new Unity project with a scene that has the NetworkManager script attached to a game object
- A player prefab which is a basic capsule with a PlayerScript added and some basic movement.
- You can start a
Client + Hostand run around the scene with WASD on your keyboard and connecting another client will show both clients in the scene
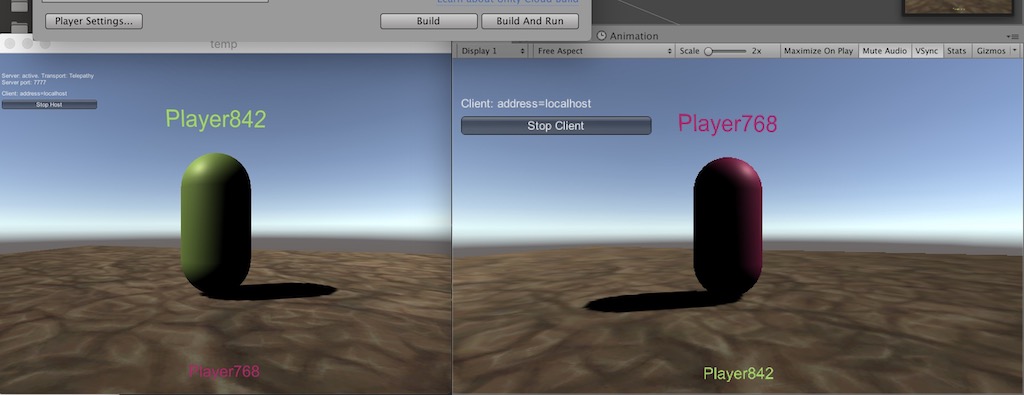
Image from Mirror Getting Started Guide
Adding ODIN
In this section, we’ll add ODIN to our simple multiplayer example. Every user connected to the server will join the same
ODIN room once connected to the multiplayer server. Each player will act as an AudioSource
and will play
the voice of the corresponding player in real-time. Audio will use a spatialBlend
of 1.0 and as such
the 3D position will be taken into account by Unity automatically.
Players voice will come out of the direction they are on screen (or even behind you) and the volume will increase or decrease depending on how close these players are.
Let’s get started!
First, we need to add the Unity ODIN SDK to our project.
Download SDK and install
Follow these steps to install the ODIN SDK into the project. For this guide, we recommend using the Unity Package as it’s the simplest way of installing it.
4Players ODIN supports Unity 2019.4 or any later version. The latest version is always available in our Github
repository or in the
Unity Asset Store.
There are numerous ways to install ODIN into your project. We recommend using Package Manager.
Install via Asset Store
4Players ODIN package has been in the asset store for many months and has been updated every week and passed the approval process numerous times. But suddenly Unity pulled our package from the asset store claiming that we have to be part of their Verified Partner Solutions program. We are in the process to get that resolved, but in the meantime you need to install ODIN using the Package Manager manually. Sorry for the inconvenience. Please contact our support if you have any issues with the installation.
Install via Unity Package
Please download the latest version of the ODIN Unity SDK as a .unitypackage from the [Github releases page]
(https://github.com/4Players/odin-sdk-unity/releases). Just double-click the .unitypackage to import it into your
current Unity editor project.
Package Manager
Using the Package Manager will ensure that all dependencies are set up correctly and that you will have the most up to date version of the SDK. In most cases, using the Package Manager is the way to go.
To open the Package Manager, navigate to Window and then click Package Manager in your Unity Editor menu bar.
Using our Git Repository
Click the + button in the upper left and select Add package from git URL. Next, enter this URL and hit enter to import the package:
https://github.com/4Players/odin-sdk-unity.git
Using a Tarball Archive
Click the + button in the upper left and select Add package from tarball. Next, select the odin.tgz archive you’ve downloaded from the Github releases page to import the package.
Add ODIN Handler Prefab
After installation, you’ll find 4Players ODIN in Packages in your asset browser of Unity. Navigate to Samples/Audio3D
and drag & drop the OdinManager 3D Variant prefab into your scene. Click on the prefab and in the inspector you’ll see
something like this:
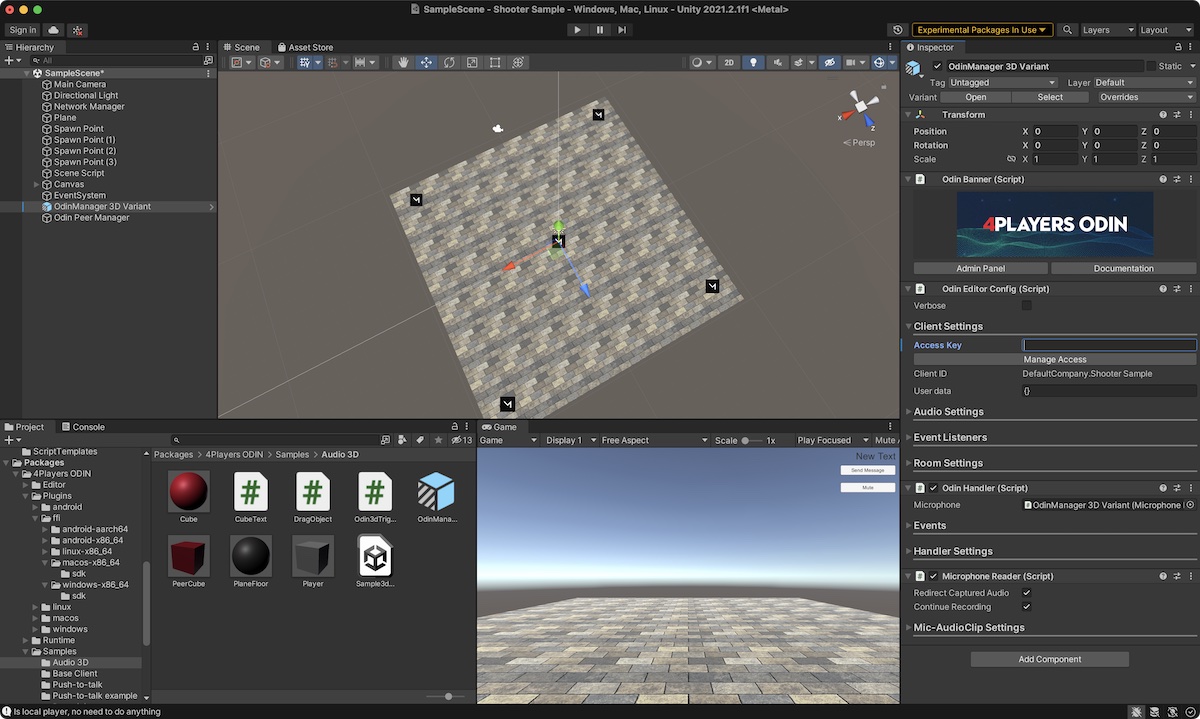
The ODIN Manager in Unity Inspector
The ODIN Manager will do the following for you:
- Activate the default Microphone and capture it’s input (if Auto-Start Microphone Listener
is active in
Mic-AudioClip Settingssection is activated which is the default) - Handles all ODIN events and exposes delegates to react on those
Set Access Token
Now, that we have added ODIN manager to our scene, we need to set an access key. This is an important topic, that we
don’t want to dive in deeper right now, but you’ll have to take a minute to understand that later. Check out our guide
on this topic here: Understanding Access Keys. As we want to keep things simple, you
can generate an access key right from Unity. Click on the Manage Access
in the inspector in the Client Settings
section in the ODIN Inspector. You’ll see a dialog like this:
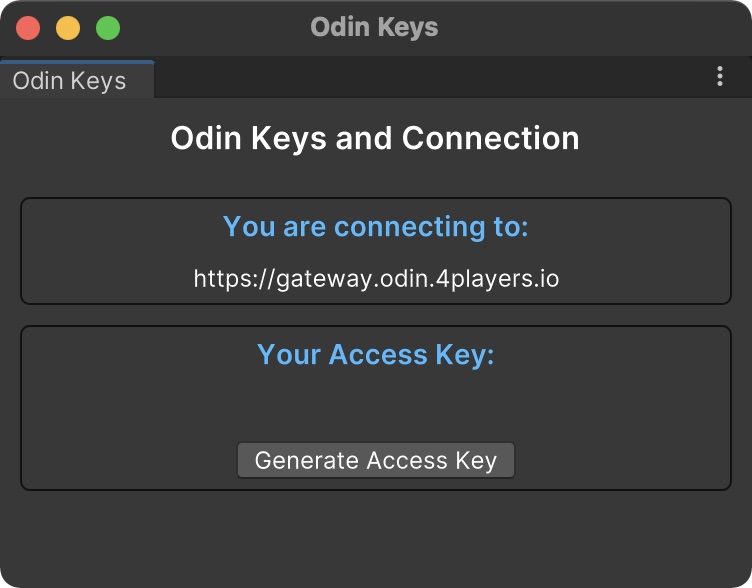
Generate an access token within Unity
You can click on the Generate Access Key to generate an access key for free. This will allow you to connect with up
to 25 users. However, there is no support from us.
Mapping ODIN users to players
As you can see in the diagram above it’s important to match ODIN users to the players in the game, so that you can attach the audio output to the correct player. If you are just using “God Voice” mode, i.e. all players have the same volume and direction (like in radio or video conferencing) then this is not required, but it’s recommend.
In Mirror, every networked object has a NetworkIdentity
. And every NetworkIdentity
has a netId
which is an integer
value that is unique for every object being part of the network. Every player with a PlayerScript attached to it also
has a netId
. We just use that netId
to match ODIN users with networked player objects.
Every Odin peer has UserData
for these use-cases. You can use it to store arbitrary data linked to a user. When the player
has been connected to the server, a local instance of the player is created and the OnStartLocalPlayer
function is called.
With ODIN integrated, the PlayerScript.OnStartLocalPlayer function looks like this:
public override void OnStartLocalPlayer()
{
    sceneScript.playerScript = this;

    Camera.main.transform.SetParent(transform);
    Camera.main.transform.localPosition = new Vector3(0, 0, 0);
    Camera.main.transform.localRotation = Quaternion.identity;

    floatingInfo.transform.localPosition = new Vector3(0, -0.3f, 0.6f);
    floatingInfo.transform.localScale = new Vector3(0.1f, 0.1f, 0.1f);

    string name = "Player" + Random.Range(100, 999);
    Color color = new Color(Random.Range(0f, 1f), Random.Range(0f, 1f), Random.Range(0f, 1f));

    // Generate a JSON User Data object with the players netId and name in the network
    CustomUserDataJsonFormat userData = new CustomUserDataJsonFormat(name, "online");
    userData.seed = netId.ToString();

    // Join ODIN Room ShooterSample and send user data
    OdinHandler.Instance.JoinRoom("ShooterSample", userData.ToUserData());

    // Send users data to the server
    CmdSetupPlayer(name, color, netId.ToString());
}
As you can see, we generate a simple UserData JSON object with name and seed. seed is used as an “external” identifier
that can be used to link the games identifiers to ODIN.
Please note: UserData
in ODIN is just a byte array and can be used for anything. It can be updated with the UpdateUserData
method provided in the Room
class of the ODIN SDK. You can use the class CustomUserDataJsonFormat
which provides a standard
interface that is also used in our Web SDK (so both can work seamlessly together). CustomUserDataJsonFormat
serialized its data
to a JSON (ToUserData
and FromUserData
) representation.
Once that is done, we join the ODIN room ShooterSample. We have also extended
the CmdSetupPlayer function and added another parameter to send the users netId
to the server and to keep it in
sync with the other clients:
[SyncVar(hook = nameof(OnNameChanged))]
public string playerName;

[SyncVar(hook = nameof(OnColorChanged))]
public Color playerColor = Color.white;

// The new SyncVar to store the users netId as an ODIN seed
[SyncVar]
public string odinSeed;
This is the new version of CmdSetupPlayer after integrating ODIN:
[Command]
public void CmdSetupPlayer(string _name, Color _col, string netId)
{
    // player info sent to server, then server updates sync vars which handles it on all clients
    playerName = _name;
    playerColor = _col;
    odinSeed = netId;
    sceneScript.statusText = $"{playerName} joined.";
}
That’s it. Now every user will expose their ODIN identifier to the network and will also send that identifier to ODIN. Of course, many other things can be used as the identifier, being it the user id from authentication or a random id.
Understanding ODIN rooms
ODIN follows a couple of very simple rules:
- All users connected to the same room can here everyone else (except they are muted)
- A room is created if the first users is connected and is being deleted if the last one disconnects from it
- One user can join multiple rooms simultaneously
So, it’s up to us to decide how we leverage that. You can have one large room for all players or you can have a room for each team. And you can also have multiple rooms at the same time. Think about a game like CounterStrike. There could be three rooms:
- In one room, every player is connected and this room uses positional 3D audio
- One room for Terrorists (i.e. all players are connected via virtual radio) which uses layered audio
- One room for Counter Terrorists (i.e. all players are connected via virtual radio) which uses layered audio
In this usage scenario players can talk to everyone else crystal clear as they would in real life via radia or telefone. But players would also expose their voice inside the game at their 3D position. So, if you talk to others, an opponent which is close to you can listen to what you are talking about. This exposes your position and it also gives opponent a chance to learn about your strategy.
In this example, we’ll stick to one room using 3D audio. Every AudioSource in Unity has a property called spatialBlend . Here is an excerpt of the Unity documentation:
Sets how much this AudioSource is affected by 3D spatialisation calculations (attenuation, doppler etc). 0.0 makes the sound full 2D, 1.0 makes it full 3D.
So, what we do with ODIN is that we attach a special ODIN powered AudioSource
to the player object (head) and set
spatialBlend
to 1.0 to make it full 3D audio. If you want to have “Gods voice” mode, i.e. no 3D positioning then
you would set that value to 0.0. That’s it! With ODIN this is all you have to do to have standard, equal volume radio
type voice or 3D positional audio.
Attach ODIN voice to player objects
Let’s recap what we have now:
- We have a simple multiple “game” that allows multiple players to connect and running around the scene
- Every player connects to the
ShooterSampleroom in ODIN and exposes a unique ID (in this case theNetworkIdentity.netId) to the network and ODIN
Once connected to ODIN, the ODIN server will send events whenever something happens of interest. If just connected, ODIN will send a couple of OnPeerJoined and OnMediaAdded events to inform about all players available in that room.
You can hook up those events via code or by linking them in the inspector in Unity. In this example, we do it via Inspector.
So, we create a new Game Object in the scene called Odin Peer Manager and create a new script OdinPeerManager which
is linked to the Odin Peer Manager game object. This is the complete OdinPeerManager script:
using System.Collections;
using System.Collections.Generic;
using Mirror.Examples.Chat;
using OdinNative.Odin;
using OdinNative.Odin.Room;
using OdinNative.Unity;
using OdinNative.Unity.Audio;
using QuickStart;
using UnityEngine;

public class OdinPeerManager : MonoBehaviour
{
    private bool muted = false;

    private void AttachOdinPlaybackToPlayer(PlayerScript player, Room room, ulong peerId, int mediaId)
    {
        PlaybackComponent playback = OdinHandler.Instance.AddPlaybackComponent(player.gameObject, room.Config.Name, peerId, mediaId);

        // Set the spatialBlend to 1 for full 3D audio. Set it to 0 if you want to have a steady volume independent of 3D position
        playback.PlaybackSource.spatialBlend = 1.0f; // set AudioSource to full 3D
    }

    public PlayerScript GetPlayerForOdinPeer(CustomUserDataJsonFormat userData)
    {
        if (userData.seed != null)
        {
            Debug.Log("Player has network Id: " + userData.seed);
            PlayerScript[] players = FindObjectsOfType<PlayerScript>();
            foreach (var player in players)
            {
                if (player.odinSeed == userData.seed)
                {
                    Debug.Log("Found PlayerScript with seed " + userData.seed);
                    if (player.isLocalPlayer)
                    {
                        Debug.Log("Is local player, no need to do anything");
                    }
                    else
                    {
                        // We have matched the OdinPeer with our local player instance
                        return player;
                    }
                }
            }
        }

        return null;
    }

    public void RemoveOdinPlaybackFromPlayer(PlayerScript player)
    {
        PlaybackComponent playback = player.GetComponent<PlaybackComponent>();
        Destroy(playback);

        AudioSource audioSource = player.GetComponent<AudioSource>();
        Destroy(audioSource);
    }

    public void OnMediaRemoved(object sender, MediaRemovedEventArgs eventArgs)
    {
        Room room = sender as Room;
        Debug.Log($"ODIN MEDIA REMOVED. Room: {room.Config.Name}, MediaId: {eventArgs.Media.Id}, UserData: {eventArgs.Peer.UserData.ToString()}");

        CustomUserDataJsonFormat userData = CustomUserDataJsonFormat.FromUserData(eventArgs.Peer.UserData);
        PlayerScript player = GetPlayerForOdinPeer(userData);
        if (player)
        {
            RemoveOdinPlaybackFromPlayer(player);
        }
    }

    public void OnMediaAdded(object sender, MediaAddedEventArgs eventArgs)
    {
        Room room = sender as Room;
        Debug.Log($"ODIN MEDIA ADDED. Room: {room.Config.Name}, PeerId: {eventArgs.PeerId}, MediaId: {eventArgs.Media.Id}, UserData: {eventArgs.Peer.UserData.ToString()}");

        CustomUserDataJsonFormat userData = CustomUserDataJsonFormat.FromUserData(eventArgs.Peer.UserData);
        PlayerScript player = GetPlayerForOdinPeer(userData);
        if (player)
        {
            AttachOdinPlaybackToPlayer(player, room, eventArgs.PeerId, eventArgs.Media.Id);
        }
    }

    public void ToggleMute()
    {
        muted = !muted;

        foreach (var room in OdinHandler.Instance.Rooms)
        {
            OdinHandler.Instance.Microphone.MuteRoomMicrophone(room, muted);
        }
    }
}
We are only interested in the OnMediaAdded
and MediaRemoved events. Those events are
sent whenever a user has joined a room and started to send audio. Or if that player stopped sending audio.
So, we created two functions OnMediaAdded
and OnMediaRemoved and linked those two events in the Odin Manager:
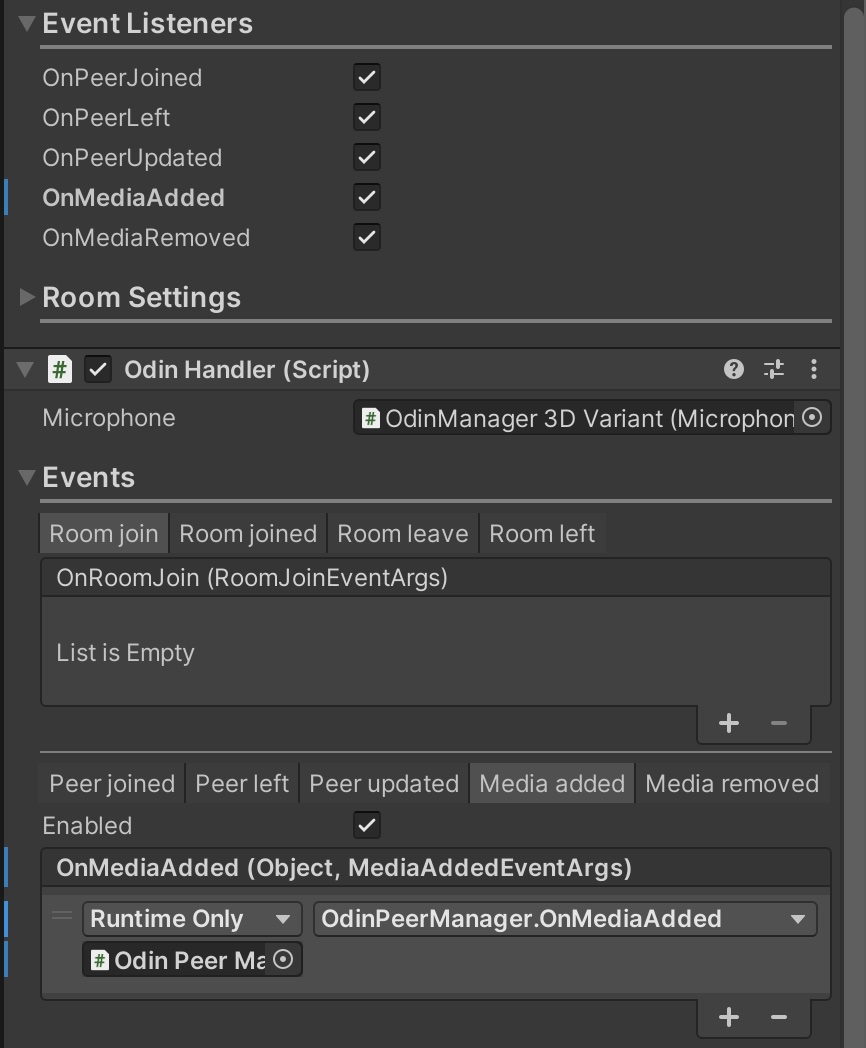
ODIN events linked to our new OdinPeerManager object
So, let’s dive into that a bit. OnMediaAdded is called for each player that is connected to ODIN once the current player connects and is also called if another player joins later.
public void OnMediaAdded(object sender, MediaAddedEventArgs eventArgs)
{
    Room room = sender as Room;
    Debug.Log($"ODIN MEDIA ADDED. Room: {room.Config.Name}, PeerId: {eventArgs.PeerId}, MediaId: {eventArgs.Media.Id}, UserData: {eventArgs.Peer.UserData.ToString()}");

    CustomUserDataJsonFormat userData = CustomUserDataJsonFormat.FromUserData(eventArgs.Peer.UserData);
    PlayerScript player = GetPlayerForOdinPeer(userData);
    if (player)
    {
        AttachOdinPlaybackToPlayer(player, room, eventArgs.PeerId, eventArgs.Media.Id);
    }
}
The sender is a Room object in this case. So we cast it to the Room. In the MediaAddedEventArgs object a lot of
interesting info is sent from the server to the client. We are mostly interested in the UserData object. We can convert
that generic object using the CustomUserDataJsonFormat.FromUserData method to a CustomUserDataJsonFormat object that has this structure :
public class CustomUserDataJsonFormat
{
    public string name;
    public string seed;
    public string status;
    public int muted;
    public string user;
    public string renderer;
    public string platform;
    public string revision;
    public string version;
    public string buildno;

    ...
}
Perhaps you remember that when connecting to the ODIN room (see above) we created a UserData object in OnStartLocalPlayer:
  // Generate a JSON User Data object with the players netId and name in the network
  CustomUserDataJsonFormat userData = new CustomUserDataJsonFormat(name, "online");
  userData.seed = netId.ToString();

  // Join ODIN Room ShooterSample and send user data
  OdinHandler.Instance.JoinRoom("ShooterSample", userData.ToUserData());
As you can see, we used the seed property to set a unique ID within the ODIN ecosystem (which is the netId).
So, the seed in this CustomUserDataJsonFormat is a network identifier which should be available within our current scene. All
we have to do is find all PlayerScript objects in the scene and find that one with this netId and we have matched
the player to the ODIN user. This is done in the GetPlayerForOdinPeer function.
Please note: The OnMediaAdded
event is sent for all players in the room, including the local player. We don’t want
to attach the AudioSource
to the local player, as we would then have an echo. So we check out if the found player
the local player with isLocalPlayer and if that’s the case, we just return null.
Now that we matched the player to the ODIN peer, we just need to attach the special ODIN powered AudioSource
which will
basically just output the users microphone input to the corresponding player object. We do that in the AttachOdinPlaybackToPlayer
function which in turn uses the AddPlaybackComponent
function of the ODIN SDK.
We get back a PlaybackComponent that we can use to adjust the spatialBlend . In this case, we set it to 1.0 to enable full 3D audio. You can also change that to 0.0 to have radio like voice communication.
That’s it!
Congratulations, you have added ODIN to a multiplayer game complete with 3D spatial audio. Multiple players connect to the server and their voice will be coming from the position they are related to the players position and the volume will change with the distance.